SeanHoppe.com > CLEO Tips > Cleo Harmony Configuring a New Trading Partner and Partner Mailbox
Configuring a New Trading Partner and Partner Mailbox
1st March 2017
After creating a new partnership, some additional configuration is required.
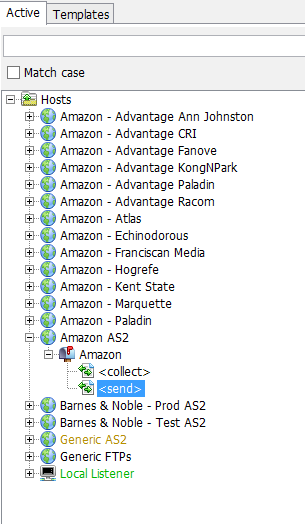
Select the Partnership
Find the partnership under the ACTIVE tab of the TREE view, and highlight it.
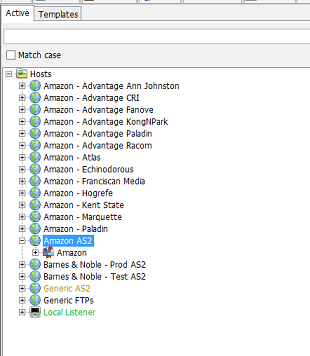
The details of the partnership will be displayed on the right in the CONTENT window.
In the CONTENT window for the partnership level, there are 2 tabs that need to be edited:
- General
- HTTP
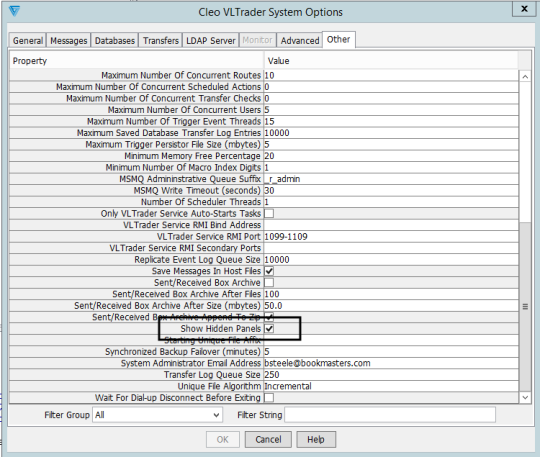
- The HTTP tab needs to be added by performing a one-time change via the following steps:
- Click CONFIGURE > OPTIONS
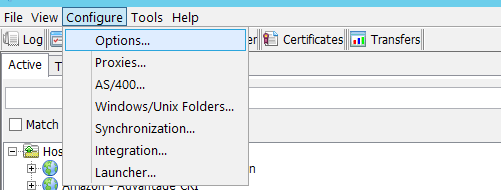
- Select the OPTIONS tab
- Click Show Hidden Panel
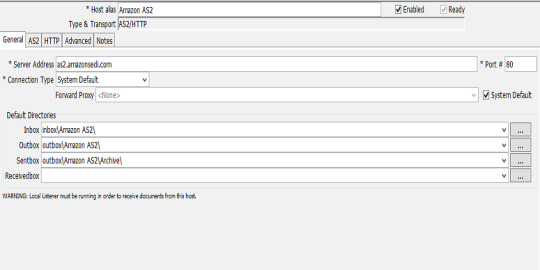
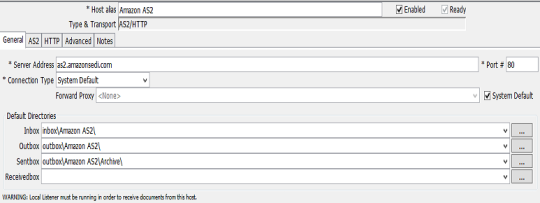
General Tab
The
GENERAL
tab contains the Server Address and Port as well as the directories
used for inbound and outbound communication.
-
Server Address – URL or IP Address of the partner’s AS2 server.
- Port # - The Port on the server through which data will pass.
- Inbox – Directory where inbound data will write.
- Outbound – Directory from which data will be sent.
- Sentbox – Directory where outbound data will be archived.
- Receivedbox – Directory where inbound data will be archived.
HTTP Tab
The
HTTP
tab contains instructions for the transfer of data. Most of the tab
is defined by default, but when communicating with the server, via
AS2/HTTP, the Path where the data will be written must be specified.
-
Open HTTP Tab.
- Double click the PATH field on the PUT command.
- Enter the Directory Path on the target server.
- Click Apply.

Select and Configure Mailbox
Each
partnership can contain multiple mailboxes.

To define how each mailbox functions, select the mailbox and edit the tabs in the CONTENT window. The tabs that must be edited are:
-
AS2
- Certificates
- HTTP
Define AS2 Tab
The
AS2
tab defines the type of security used during communication and how
receipts will be delivered.
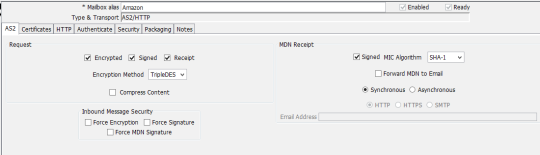
-
Click the AS2 tab in the CONTENT window.
- Select the request options: Encrypted, Signed, and Receipt
- Select Encryption Method.
- Select MDN Receipt options: Signed, MIC type, and Synchronous/Asynchronous.
- Optional: Select Forced Message Security options.
Select Certificates
Signed
and Secured AS2 communication requires Certificates. Define the
certificates for the mailbox via the Certificates
Tab.
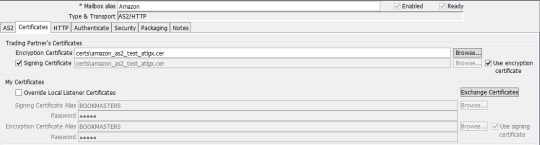
- Click the Certificates Tab in the CONTENT window.
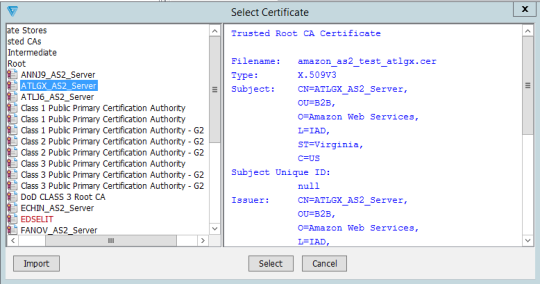
- Click Browse… on the Encryption Certificate entry.
- Select the Certificate provided by the partner
-
Check the Signing Certificate box to use the same certificate during the signing process.
- Check the Use Encryption Certificate box.
- Click Apply.
HTTP Tab
The HTTP tab contains the AS2-From and AS2-To header information and must be configured for each partner.
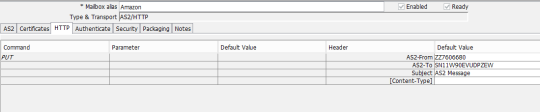
-
Click the HTTP Tab.
- Double click in the “Default Value” field of the AS2-From.
- Enter YOUR AS ID.
- Double click in the “Default Value” field of the AS2-To.
- Enter PARTNER AS ID.
- Click Apply.
Select
and Define Actions
Each
partnership mailbox can be configured for multiple actions to
Receive, Send, etc. These actions must be defined before
communication can take place.
- Click one of the preset actions.
- If a new action is required, right-click the mailbox and select New Action.
2.In the CONTENT window, double click the preset command, or click the New Action Wizard button.
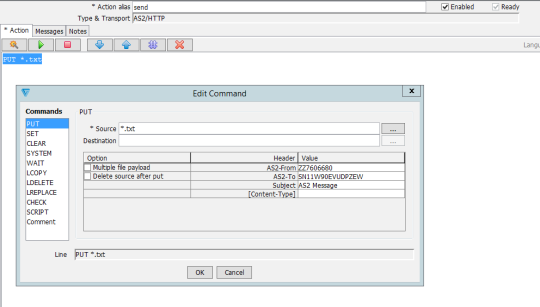
- Header values are captured from the HTTP Tab on the Mailbox.
- Define the Source name; this can be a wildcard value of * or a specific file name.
- Define the options: Multi File Payload and/or Delete Source After Put
- Click OK.
- Click Apply.
Setup is now complete and testing may begin with this partnership.
By: Sean Hoppe on